Showing posts with label Carisa. Show all posts

Friday, 8 July 2011

It's my farewell post....

Happy Friday, Simply Sassy Fans!

It really seems like yesterday when I got the happy email from Maria Therese asking if I'd join the Sassy girls for  a guest spot and now it's over much too soon! *tears* I had a blast designing with the sassy girls during these past 2 releases - they are so much fun and sweet to be around. I'm keeping my fingers crossed to be asked to come back some day! :D I will always be a Simply Sassy fan and will continue to use them often so be sure to stop by my blog any time for more inspiration. :D


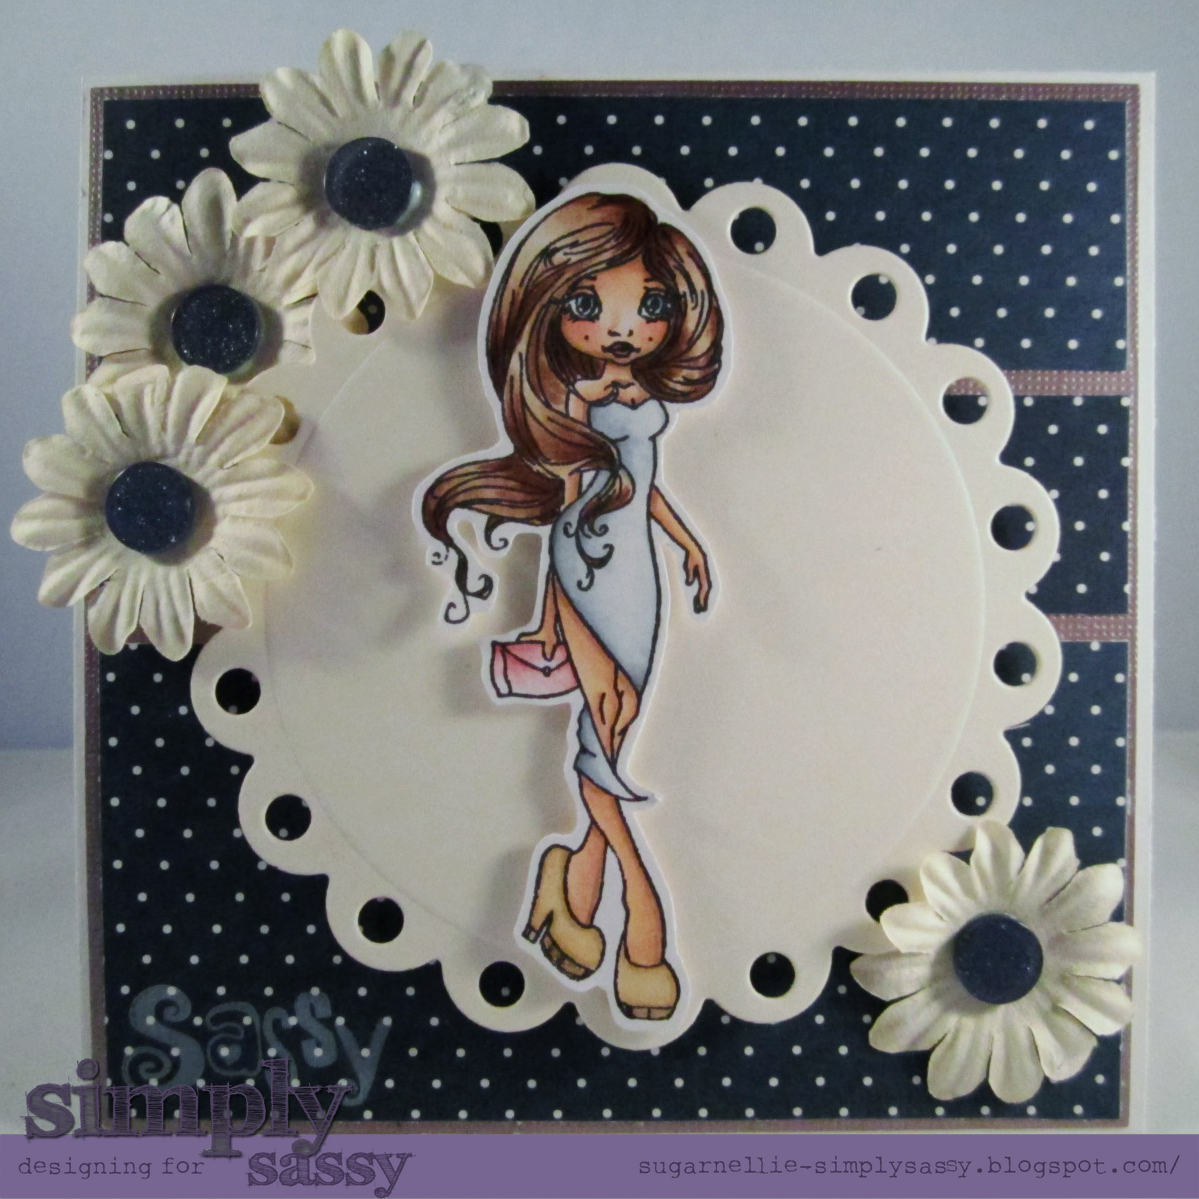
For my final inspiration card today, I just HAD to ink up Rupunzel! I loved her from the moment I saw her and that was the first set where I bought ALL 6 of them at once! I know, I couldn't help myself! :D So, when making a birthday card for my daughter last week, this stamp definitely was the one to use because of her long beautiful hair. My daughter, 1. LOVES the movie Tangled and 2. Has pretty long hair herself! I colored Rupunzel using copics and gave her dark brown hair and hazel eyes like my daughter and a fabulous red dress because my daughter's favorite color is red. Now, I have to say here, that while I was making this card it was late....my daughter's birthday was the next day (I am NEVER one to make a card too early, LOL) and I put a big giant 5 on it and took this pic when I was all done. THEN I went to show it to my hubby and he looks at it, then looks at me and says "What's the 5 for?" to which I immediately exclaim "Oh My GAWD, she's 6!!!" LOL So, thankfully it was just easy peasy to switch out this sticker for the one that said 6 but I just didn't photograph it again. haha I think I was just in a little bit of denial that my firstborn is growing up so fast! Now, when she saw the CORRECT card, she literally gasped and said "I love it, mom!" Now, THAT was the best reaction. :D She's by far my BIGGEST fan!

So, that is my final post. I am sad but so happy to have had this amazing opportunity to design for Simply Sassy stamps. It truly was an honor and one I will cherish always! Like I said, I have fallen hard for these adorable images, they have even worked their way up to my top 3 stamp loves for sure! I am just thrilled that Krista shares with us her art in this way so we can all enjoy her images for years and years! :D

Hugs,
Carisa

Supplies:
  • Simply Sassy Rupunzel Stamp
  • PTI Kraft & Pure Poppy Cardstock
  • Copic Xpress It Blending Card
  • Memento Tuxedo Black Ink
  • American Crafts Confetti Collection
  • Copics - E0000, E000, E00, E21, E30, E31, E53, E51, E43, E37, E29, E39, E47, E49, E42, E44, R89, R81, R22, R24, R27, R29, R46, E09, BG10

Friday, 1 July 2011

Puppy Love Birthday

Hi, Simply Sassy Fans! 


I have a fun card to share with you today using a stamp from the most recent holiday release called Puppy Love which is available at Funky Kits - though it seems to be out of stock now because it's super cute! When I saw this one, immediately it reminded me of when I was 10 and got a puppy for my birthday so I had to alter it a bit for a bday card. It was very easy to do as I just cut out the bone with the holly on it and whala, birthday card! :D I paper pieced the present with matching paper and added a simple  birthday sentiment. I colored the image with copics but forgot to write them down before I packed them up. I love the hair on this one as it's fun to color curly hair a bit messy with little blending! :D

That's it for me today - hope you have a fabulous weekend. I'll be back next Friday with my last Simply Sassy post *sniff, sniff* It's been so much fun designing for Simply Sassy & with the rest of the Simply Sassy team. Let me tell you, it went by WAYYYY too fast!!!

Hugs,
Carisa

Supplies:
  • Stamps - Simply Sassy Puppy Love; PTI Birthday Sentiment
  • Paper - Copic Xpress It CS; PTI CS in Kraft & Aqua Mist; American Crafts Confetti
  • Ink - Memento Tuxedo Black; Walnut Stain Distress Ink
  • Button & Ribbon from PTI
  • Copics

Friday, 17 June 2011

'Tis The Season to SHOP!

Today I'm sharing a sneaky peek of the all new Retail Therapy Simply Sassy stamp that will be available TOMORROW exclusively at Funky Kits! I loved this one as soon as I saw her! I mean, how chic is she with all her fun packages and cute little ear muffs. She was an absolute blast to color and I can see paper piecing those packages for another fun look. I can't wait for the hop tomorrow - You are going to LOVE these new stamps! :D

Supplies:
Stamps - Simply Sassy Retail Therapy; PTI Winter Swirls
Paper - Make it Colourful Blending Cardstock; The Greeting Farm Holiday Papers
Copics - E0000, E000, E00, E11, R20, R21, E30, E25, E57, B32, B34, YG11, YG13, YG17, RV09, R83, R89, RV10, C3, C6, C8, E53, E51, E50, BG10
Adhesive - Helmar Tape Runner, Helmar Zap Dots, Helmar Craft Glue

Friday, 10 June 2011

So Sassy!

Hi Simply Sassy Fans!

This is the only one of the most recent collection that I received that I hadn't inked up yet so today is HER day! She's called 5th Avenue and is available at Funky Kits NOW. OH MY GOODNESS - She totally puts the Sassy in Simply Sassy!!! I LOVE LOVE LOVE coloring her hair! It's just so beautiful and flowing - almost makes me want to grow my own hair out! haha *almost* I tried a new coloring technique which is coloring to look like distress inks with copics. It was fun to try out a new technique and I will definitely be revisiting this one. I also used the sketch at The Sugar Bowl and you still have plenty of time to enter! Thanks for stopping by and I hope you have a fabulous weekend!

Supplies:
Stamp - Simply Sassy 5th Avenue
Ink - Memento Tuxedo Black, Palette Snow White
Paper - PaperTrey Ink, Misc from stash
Copics - E13, E11, E00, E000, E27, E25, E30, E41, E50, E51, E55, B91, B95, B04, B00
Embellishments - KaiserCraft Flowers & Bella Dots
Adhesive - Helmar Quick Fix Tape Runner, Helmar Zap Dots, Helmar Craft Glue, Helmar Gemstone Glue

Friday, 3 June 2011

Oh La La Birthday!

Hi Simply Sassy Fans!

For my Friday Inspiration Post, I just HAD to ink up Oh La La! She's from the previous release and I'm just now getting around to putting her on a card! I colored her entirely with W1, W3, W5 & W7 copics. I paired her up with some new *to me* Graphic 45 papers. I hope you have enjoyed my tutorials for Simply Sassy - I loved making them and want to thank the girls for encouraging me to step out of my comfort zone...I'm usually the one FOLLOWING tutorials not giving them! :D 

I hope everyone has a fantastic weekend planned. I'm so excited because as this post goes live, I'm at my daughter's kindergarten graduation - Yay, last day of school!!! :D

Hugs,
Carisa

Supplies:
Stamp: Simply Sassy Oh La La
Paper: Copic Xpress It Blending Card; Graphic 45 Curtain Call Collection
American Crafts Rose Ribbon, Tim Holtz Fragments, Make it Crafty LaserCut Chipboard
Copics: W1, W3, W5, W7
Adhesive: Helmar Tape Runner, Helmar 450 Quick Dry

Thursday, 2 June 2011

Paper Bag Mini Album Tutorial!

Hi Simply Sassy Fans! 

I'm sorry this tutorial is late! I am stepping in for Autumn today and it took longer than I thought to put the video together - it's the editing that gets me every time.

Today I want to share with you are little mini album I'm in the middle of creating for my daughter. She is just ending her kindergarten year and I started this and am now working toward finishing it. Most likely will be my little summer project!

What You'll Need: 
Small Paper Bags *lunch bag size*
Pattern Paper & Your favorite Simply Sassy Stamp to decorate
Strong Adhesive *I used Helmar Acid Free & Craft Glue*

And here is the video...I'm still not completely comfortable talking in front of the camera yet! LOL I feel silly talking to an empty room....and I could NOT figure out how to add music to the parts I sped up so I apologize for the silence but it really helped to keep the video under 7 minutes. :D I hope you like!


Supplies:
Paper: October Afternoon Report Card Collection
Adhesive: Helmar Acid Free Glue, Helmar Craft Glue & Helmar 450 Quick Dry

Friday, 27 May 2011

Pat On The Back

Hi Simply Sassy Fans!


For my Friday Inspiration post, I have used Carnival Balloon from the set 6 release. I have LOVED her since I saw a sneak peek from Tracy on the DT way back when. I finally colored her up and put her on card. She's definitely a favorite - perfect for a birthday card I think which I will be using her next for. I was experimenting here with some white space as you can see....I'm not sure what I think quite yet. I love the effect when I see it on other cards/layouts but I'm addicted to my big panel of pattern paper still! haha I think that balloon is DESIGNED for paper piecing - SO cute and fun to add even more colorful paper to my project. I loved coloring her with copics and unfortunately, I made this card about 2 weeks ago and did NOT write the colors down before putting my markers away!!! You can see I've paired her up with more Echo Park For The Record Collection *giggle* Geez, I seem to get stuck on one paper collection and design the heck out of it. I do have other papers..... 

Thanks for stopping by today and if you haven't had a chance, PLEASE take a look at my corner bookmark video tutorial from yesterday! I had so much fun putting it together and would love your feedback...Like should I do more?? Cuz, I think I wanna ;D

Supplies:
Stamp: Carnival Balloon Simply Sassy
Paper: Echo Park For The Record Collection
Ink: Memento Tuxedo Black
Embellishment: Make it Crafy Laser Chipboard Filligree Jewels
Adhesive: Helmar Craft Glue

Thursday, 26 May 2011

Corner Bookmark Tutorial!

Hi Simply Sassy Fans!

I'm so excited to share my corner bookmark tutorial with you today! :D I am going out of my comfort zone and have created a video tutorial! This is my first EVER so bear with me. haha I hope you don't mind being my guinea pigs! ;) I thought it would be fun and it actually was once I got over my stage fright! It is a bit long so I apologize in advance.

So here is what we're going to make in the video:

Super easy to create! Here is what you will need:

1 - 4" x 4" heavy cardstock 
2 - 1 7/8"x 3 7/8" pattern paper
1 - 2 3/4" 2 3/4" pattern paper
Embellishments as desired!

Here is the tutorial *sorry the quality is bad - I had to reduce it in order to get the video to load up to youtube* Any tips, suggestions, etc. are greatly welcomed for my first attempt at a video tutorial!


I really hope you enjoyed it! I was talking softly since my girls were asleep and my craft room is right outside their room! *giggle* I can't wait to do another one! Like I mentioned in my video, I'd LOVE to see your bookmarks. Please link them up in this post and I'll be sure to visit your blog! :D


Supplies:
Stamp - Missing You Simply Sassy Stamp
Paper - Echo Park For the Record Collection
Copics - W1, W3, W5, W7

Friday, 20 May 2011

Having fun with Shrinky Dink!

Hiya Simply Sassy Fans,

Ok, so I'm probably late to the shrinky dink party - but I finally got some and having a TON of FUN with it! Now, I haven't figured out exactly what medium is best used to color on it so my coloring has left a bit to be desired but it's still fun! I love watching it roll and shrink. *giggle*


I wanted to make a charm with Guinevere from the recently released set 7 as soon as I got her! And so I have a fun place to display her I finally altered this notebook so I can write down craft ideas as they come - I don't know about you, but I'm forever saying to myself, ooh, this would be fun to make or I want to try this and then when I actually sit down at my desk to create, I'm like, what do I want to do? Haha - All the ideas are gone by then. So, I figure if I keep this little notebook with me, I can just write down ideas as they come and flip through it when I finally have time to do something.

I wanted to make it pretty and inspiring with all my favorite things so I had to use Guinevere to match the charm along with gorgeous Graphic45 Once Upon A Springtime Collection, OA & Cosmo Cricket stickers as well as Webster's Pages sparklers. I promise I'll use a different stamp next week! haha

Here is the shrinky dink charm next to the full size image so you can get an idea of how tiny it is! Aren't they cute together? I colored them with the same copics (E70, E71, E74, E77, E79) - I was in a monotone mood, I thought it would be fun to color her in a bit of a vintagey vibe.

Have a great weekend!

Hugs,
Carisa

Friday, 6 May 2011

Teacher Appreciation Card

I am so excited to bring you my card today - she is one of my favorites - but then I probably say that with each new stamp that I ink up! haha I received my Set 6 this week and couldn't wait to ink up Winking Student just in time for Teacher Appreciation Week! I paired her up with some of my FAVORITE October Afternoon papers and colored her with copics. I kept it pretty simple but I think that's why I love it because the gorgeous image is showcased. I wanted to color blond hair today but I didn't want it to be super yellow so I used a new combination for me, let me know what you think!

I am LOVING my time with Simply Sassy - the girls are so awesome and just a blast to chat with from day to day. I can't say Thank You enough!

Supplies:
Paper: Make it Colourful Blending Card; October Afternoon
Copics: Skin - E0000, E000, E00, E11, E93, R00; Hair - E40, E41, E42, E43, YR000, YR00; Eyes - B00, B04; Clothes/Books - BG10, G20, G24, W1, W3, W7, R24, R29, R46, YG93, YG95, G99, R01, R02, E55, E59, B91, B93
Atyou Glitter Pens: Clear, Lipstick, Red, Melon, Orange, Yellow
Adhesive: ATG, Helmar Zap Dots

Friday, 29 April 2011

My first post as Simply Sassy Guest Designer!


Omgosh, I am so nervous & excited for today! So much so that I procrastinated on my card and JUST NOW FINISHED!!! I had a hard time choosing which stamp to use for my FIRST post as a Simply Sassy Guest Designer - so I finally chose Hippie Love as I've never colored her before and I just love her style - the flowers & braid are just so adorable in her hair. I feel like I'm a hippie at heart, I kinda have that free spirit inside me and I am pretty laid back. I had this Echo Park Summertime Collection already out on my desk so I decided to go with that as the colors matched how I colored perfectly and it's just a happy paper line because I am SOOOO happy to be a Sassy Girl! I got some new goodies yesterday so I just HAD to add strip of Tim Holtz Sketchbook Tissue Tape - I love the butterflies! You might also recognize the sketch - I followed the Sugar Bowl Challenge this week with their theme of Buttons as well as the sketch! I did turn it on it's side thought to accomodate the image better!

I hope I've inspired you today - I love posting on Fridays - it's such a great way to kick start my weekend playing with these lovely stamps. See you next week - Have a happy weekend!

I used a ton of copics on my card today:
Skin: E000, E00, E21, R20, R01
Eyes: B00, B04
Hair: E71, E74, E77, E79
Clothes: E50, E51, E53, E55, E57, E59, E97, YG11, YG13, YG17, B91, B93
Heart Banner: R85, R89, YR14, YR15, Y00, Y02, Y08, YG11, YG13, B05, B06, V01, V05, V06, R02, R000
Colorless Blender, C0, C1