Showing posts with label Kathrin. Show all posts

Friday, 9 December 2011

A pocket and a tag


Happy friday Sassy fans!
For today I have two projects to share. Talking about having a great finish before I go on a little christmas break...

For my first project I have used

Domestic Goddess.

She seems to be sold out at the moment but I guess she will be back soon.

I have made a little pocket with this image, that I put a recipe card into. Those recipe cards were bought at Hallmark and I love them since they are such a beautiful and easy way to share the recipe of your favourite cookies and hand it out with some of them.
I was lucky enough to have the perfectly matching paper for that card and also by coloring the image I used the beige and blue from the recipe card.


Since I think most of us store their recipe cards like I do - in a cupboard in the kitchen - I thought that too bulky embellishments would make it harder to store it. So I only went with some lace and that Yum Scale stamp by Stampin' Up. 
To the recipe card itself I added a little ribbon and that little spoon charm.

And these are the Copics that I colored the image with:


Okay, I have been talking about two projects so here's my second one today. 


I got inspired by all those beautiful tags Maria made and decided to try one myself.
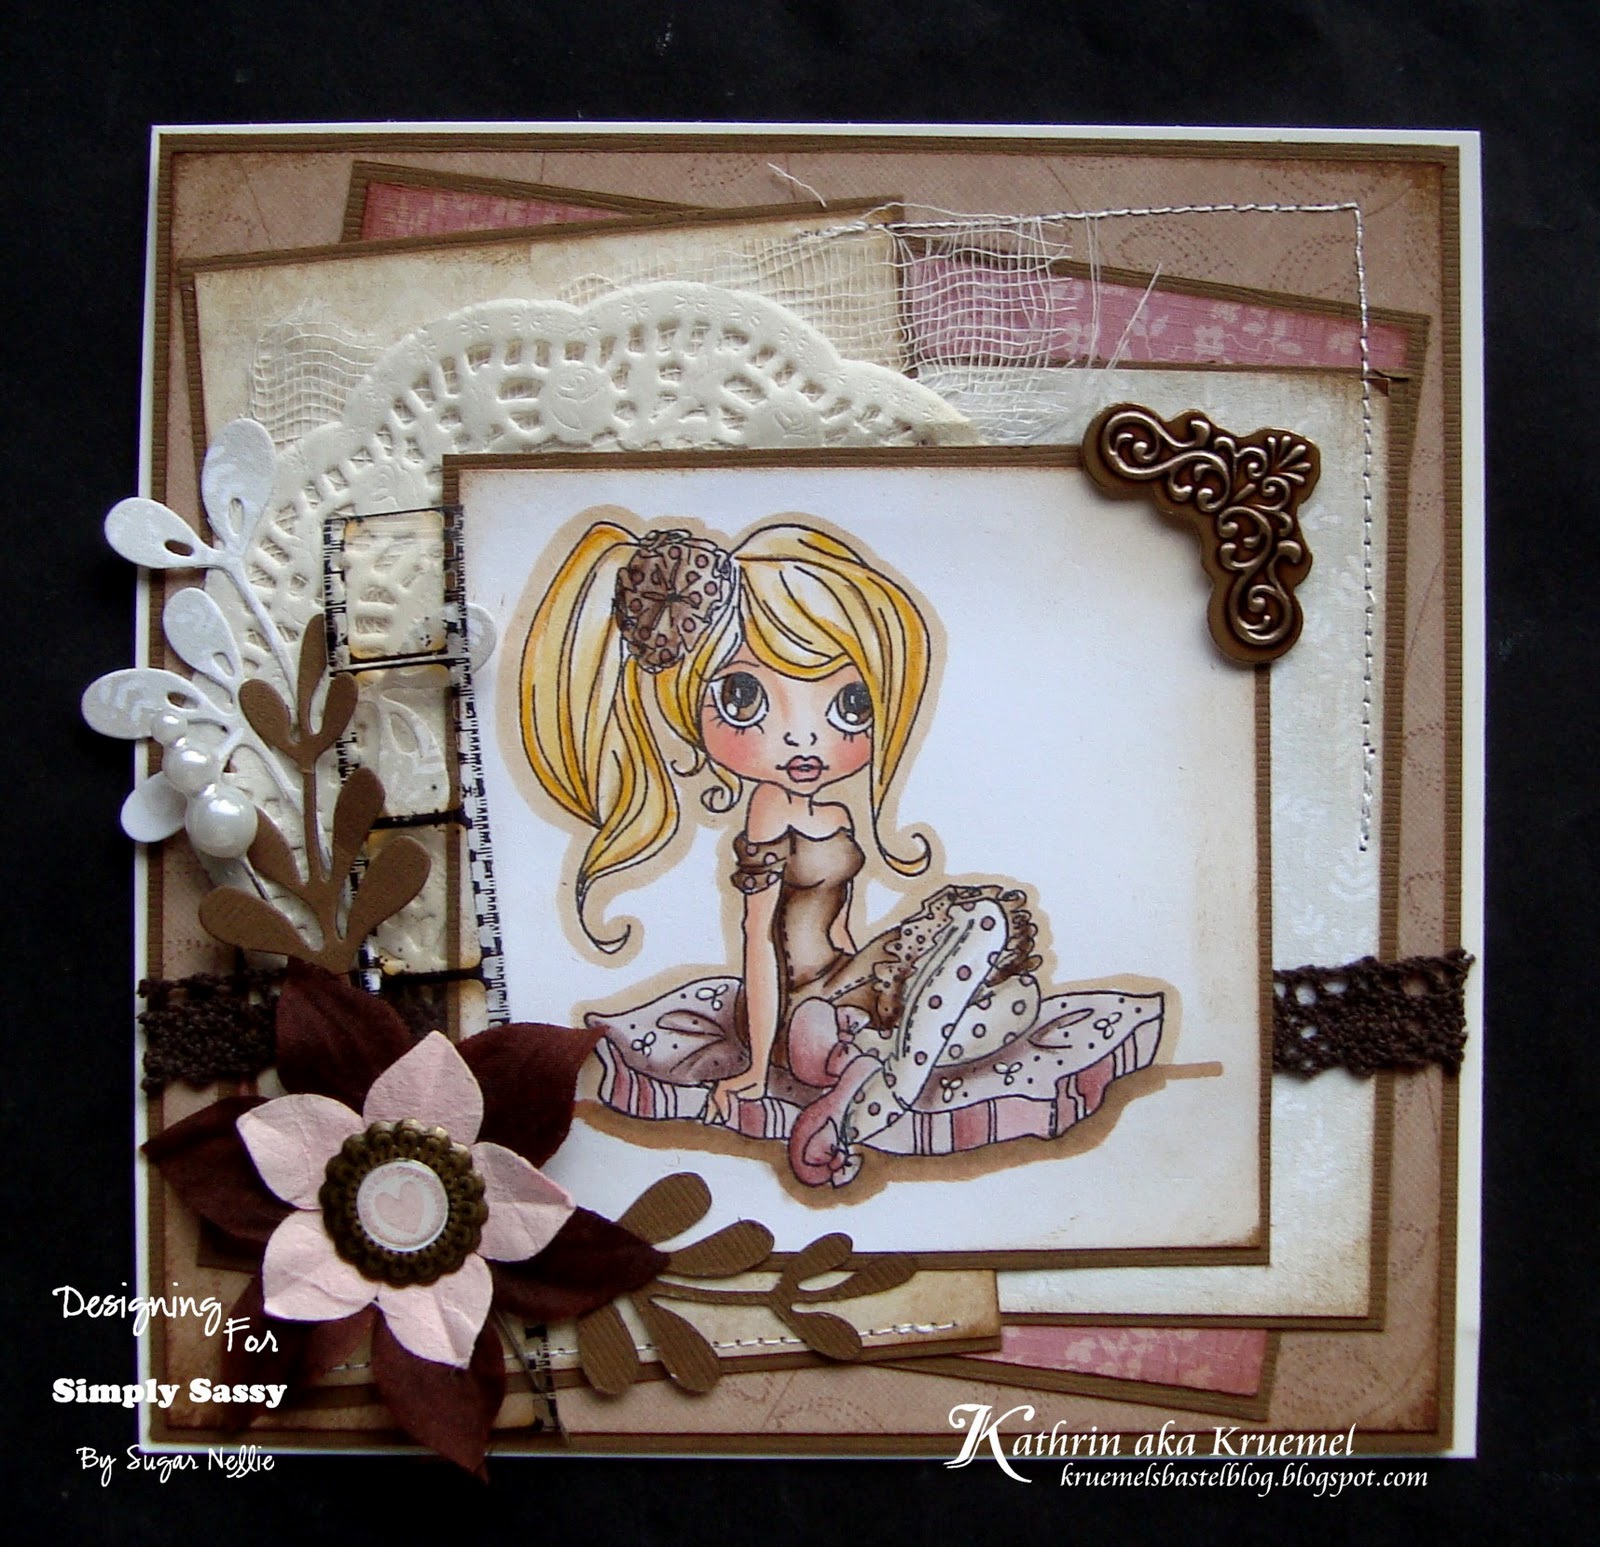
I used 

Tease Me

on it. I actually got the idea of putting this gift together from looking at the stamp. It's not really a christmas present but a little something to be handed out before so the recipient can prepare herself for a "beautiful christmas".


I went with a white and red color combo here since the bottle of body lotion was the first thing I bought and I loved its deep red color...

For coloring this image I used these markers:


Okay, that's it for now. 
Just in case I am wishing all of you a wonderful holiday season and merry christmas!


Friday, 2 December 2011

Cinderella


Hello Sassy fans and welcome to another inspiration post.

For today's card I have inked up 


She's adorable and so much fun to color! With all the pleats in her dress you really can bring this image to life - and this without much work. 

I have chosen a blue, white and black color scheme for her since I think this is a really elegant combo and fits her wonderfully. 
I used a die cut sheet on the right side of the card and a glimmery paper for the swirl and butterfly. And the princess charm was the perfect finish for this card.

I also want to share with you another card that I made - and I used 

here:


The colors I used here are totally different and so much more vibrant. She reminds me of  a girl I know and she always wears blue hair - totally or just in parts. That's why I did blue hair here. And she was just screaming for more color so I combined a dark pink with the blue. This is a color combo I rarely use but if I do, it has to be bright and shiny!LOL

The big flower matched that pink perfectly and the bird brad has been sitting in my drawer forever. I guess it was waiting for this special card.
The saying is by Stampin' Up.

Both images have been colored with Copics, and these are the ones I used (I guess you can tell from the pictures which were used for which card, right? LOL):


All that is left to do now is to wish all of you a wonderful weekend!


Friday, 25 November 2011

a winter fairy


Happy friday dear friends!

I don't know about your area but here in my part of Germany the days have been cold and foggy. No snow yet, but I'd so wish for some! I have nearly done my christmas baking, the decorations are out and on sunday we can light up the first candle on the advent wreath, a german tradition where you light up one more candle each sunday until there are four the sunday before christmas eve. So some snow is all I am missing to get in christmas mood.

Well, they say there isn't any near so I thought I'd share a winter fairy card with you - maybe this will make her curious so she comes to my area to really see it? 

I used the special "Season's Greetings" image here, the one you were only able to get when ordering the whole set last weekend. And I think it was sold out really fast.

I love this image. I can feel the frosty wind playing with her hair and for sure there are some tiny snowflakes dancing around her. So I tried to bring this on a card - there are swirls and snowflakes, of course some lace and frosty colors. I also put  a frame from clear embossing powder around her. It's hard to see on the photo but it looks like a frozen window. And the white Distress Crackle Paint makes the frosty look perfect.

These are the Copic I used to do the coloring:


Have a wonderful weekend everyone!


Friday, 18 November 2011

another sneak for you


Happy friday everyone!
Are you as excited about tomorrow's new release as we are? I know you are.
So as a little treat I have another sneak to share with you today. Let me introduce you to

Picture Pose!

She's adorable and from the moment I saw her first I knew I want to make a picture frame with her. My twins love to have photo sessions with their friends, putting on their big sister's dresses and making cool pictures in different places and poses. Well, unfortunately there wasn't one that would have fit the image so I will have to tell them to copy her pose next time.
I made a card instead and to keep with the photo theme I added a little photo strip here. 

These are the markers that I used to color her in that vintage looking pink and brown combo:


So, can't wait to see you all back tomorrow - have a great day til then!

Hugs,

Friday, 11 November 2011

HO HO HO Sassies!


Happy friday Sassy fans!
Today I have a christmas card to share that I didn't use those traditional christmas colors for but kept 
it monochromatic in browns. 

The stamp I used is 


I just love her and that fluffy fur on her dress. I am a huge fan of fur - any kind of fur and almost every single piece of my clothes has it somewhere. My husband can tell you about it!LOL
Originally I had planned to add some snow pen to the fur but well, I ordered it and it didn't arrive in time. But honestly, I am quite happy about it because I like how it turned out the way it is now.

The banner and big postage stamp are by Whimsy Stamps. Well, I am sure you have to mark "nice" for this sweetie!
The papers are all older ones from my stash, there is DCWV and K&Company but I don't remember all the brands.

These are the markers I colored the image with (only numbers today since I colored this in when I was at
a stamp meeting with a bunch of lovely ladies where I only wrote down the numbers).

E0000, E000, E11, E30, E41, E 42, E 43, E51, E70, E71, E74
W0, W1, W3, W4, W5, W7, W9
100
T1, T3
R20

Hope to see you all for sneaks of the new stamps - let me tell you: they are BEAU-TI-FUL!!


Friday, 4 November 2011

a sassy bookmark


Hello sweet sassy friends!
Well, the weather is getting colder and it's getting dark really early so is there anything better than snuggle on the couch with a blanket and read a good book? I love those winter evenings and all that's missing is the sound of the fire from a fireplace - unfortunately I don't have one so I have to imagine this.LOL

But to make reading even more fun I created a bookmark using on of the first Sassy stamps available. Unfortunately it is not up on the webshop at Funkykits at the moment so I am not able to give you a link
but the name of this cutie is Romantic Dreamer.

I made a paper rosette with quite flats pleats so the bookmark will fit in a book. I added some cheesecloth, some punched flowers, some distress ink and a few rhinestones.
The paper rosette was made from 2 square pieces of cardstock, folded every 1/8". Then two ends of one strip of folded cardstock have been put together to create a half circle - later the two half circles were brought together as a whole circle. 


The back of my bookmark isn't too spectacular - I just used a large paper clip and only fixed it at the very top part so the bottom part still moves and a paper can be put in it.

Here's what I used to color the image in:


Now I'm wishing all of you a wonderful weekend!

Hugs,

Friday, 28 October 2011

a light in the night


Hello Sassy Fans and happy friday!

The days are getting shorter and this comming weekend we will be changing the clock again to winter time which means it will be dark around 5 pm...

Well, I have never been a big fan of this (and how can you save daytime if you change the clock so it gets dark earlier? LOL) but well, it's also the start of the time where you can light up a candle in the afternoon and enjoy a cup of tea or coffee and some cozy family time.

Since I am really looking forward to this I got the idea of making a candle for my post today.
And could there be a better image than

Little Light of Mine

for this?


I stamped the candle on tissue paper once to melt it in the candle and a second time on normal cardstock to decorate the box with it.

The box was made from doublesided cardstock, behind the window I put some transparency.


These are the markers that I used to color the image -
I also colored the image on tissue paper with them, just trying to add as little color as possible since the color would bleed on the paper, but it blend wonderfully:


Have a happy weekend and enjoy the one hour more of sleep!

Friday, 21 October 2011

letter to santa


Happy friday Sassy fans! Nice to see you today.

Before I tell you about my card I have to apologize for the bad picture. The weather is so ugly and it has been that dark all day long that I wasn't able to get a better one. And this one was still better than the ones I tried to make using a flash or lamp... I will exchange it as soon as possible!

Okay, so while the weather has been that naughty this little cutie decided to
write her letter to Santa. As you can see she needed a few tries - weather it's because she made a mistake like on the shown ore or weather it's because she just couldn't decide what to ask for...

As you can see did I use

Love Letters

here but used it for a christmassy card. I love to give stamps a different use by just adding some different decorations.
I also used two of the new Magnolia dies here and I really love the spruce twigs that I added a little glittered candy cane to.

And these are the stamps that I did the coloring with:


Enjoy your weekend everyone!

Friday, 14 October 2011

cupcakes and sundaes


Hello Sassy fans and happy friday!

Today I am sharing a cupcake with you that I made for one of my girl's friend. It was her birthday and she asked for some money as the gift. Of course such a "boring" gift need an excitement packing.
While we were in Italy this summer and went grocery shopping I found these tin foil cups that also come with a plastic lid. Okay, it's kind of sad thinking of how I could use household stuff for crafting while I am at a grocery store in my vacation.LOL But I guess that's how we are, right!?

I used the

Sundae Service

and let the cupcake top match the coloring of my image.

The top of the cupcake is made from the half of a styroform ball that I glued to the lid. I painted it with white acrylic paint and added some white glitter to it. The top is made from brown velvet flock that I wanted to look like a chocolat covering.
To cover the rim of the half styroform ball I added some white ribbon to the edge that I glued down in little loops.
The cherry on top is made from a tiny styroform ball and some green wire.

Here it is opened:


And these are the Copics that I used for the coloring:


Have a happy weekend everyone!

Friday, 7 October 2011

friday fright


Happy friday Sassy Fans! Nice to see you here.

Well, october has began and Halloween is coming. Usually we don't celebrate it here in Germany but it's getting more common now. And it can't hurt to have another reason to throw a party, right? And since my girls talked me into another Hallween party with their friends - not that it took them very long to talk me into it since I loved last year's party - I am totally in the Halloween mood now. Each day there are packages arriving full of body parts and other scary stuff. So is it a wonder that I have a Halloween card to share today?

It's not one of the scary ones - this witch is too cute to be scared of her. She's called

Best Witches

and just perfect for this time of the year.
To make her look at least a bit halloween-ish I gave her a green skin and purple eyes.

I also added some cheesecloth to the card again - to me this makes perfect spiderwebs and so it went wonderful with the paper I picked. And for a Halloween party you need a skull banner, right? I cut out single skulls from a MS border punch and put it on the banner.

Here are the markers I used for the coloring:


Have a wonderful friday and see you next week!

Friday, 30 September 2011

So Charming


Hello dear Sassy-fans!
OMG, can you believe it's the last day of september? I guess we will start showing christmas cards here very soon!

For my card today I used another one of the new images, this cutie is called

Tiffany.

She was so wonderful to use and the card came together so easy.

I had to use some pink since she looks so girly with her wonderful skirt and that flower/ribbon in her hair. And to me the butterfly was the perfect thing to use with her.

When we went to a stamp fair here in Germany beginning of september my girls made a dangler for their cellphones. It's made from shrink foil and covered with a special epoxy liquid that dries under UV light and builds a scratch resistant surface to protect the image. Yep, you guessed it, I had to buy some of that epoxy stuff and so I decided to make a matching dangler from this cutie too:


She is colored with pencils and I got the colors I used on the card and the ones on the shrink foil matching really good. Unfortunately I was out of white shrink foil and had to use a semi transparent one so taking a picture of it is really hard. I had to put it on a white paper and take the picture in the sunlight...
On the star and the heart I tried coloring the foil with Copics - worked great but I need to work on it to be able to make shadows with them too.

And here's a pic of the card and the dangler together:


These are the Copics I used for the coloring:


So, once again I am wishing you a wonderful weekend!

Friday, 23 September 2011

so what...


Happy friday Sassy fans!

Today I am sharing a card that I made using

So What

from the latest release.

When I was looking at her, thinking about which saying to use with her I thought that she would be perfect to just say hi. That's why I used this cute little text stamp by Stampin' Up, put on a punched out postage stamp.

As colors I went with green and blue for her and used some shabby papers which I think suit her wonderfully. To distress the edges I used my brand-new Distrezz It All by Zutter. Well, I am a tool junkie so as soon as I saw it I knew I would buy it sooner or later. It works great - and the mess is way less than it was when I used one of those edge distressers.
I used two big blue fabric flowers and some lace as decoration.

And this is what I used to color the image with:


Have a wonderful weekend everyone!

Friday, 16 September 2011

another sneak


Happy friday Sassy fans!

It's the friday prior to our blog hop - and I know you're all as excited as we are. So have your cup of coffee ready tomorrow morning and hop along!
To give you something to look at until then I am sharing another sneak peak with you.
This cutie is called

Travel Lite.

So of course it inspired me to make something travelling related.
This isn't a card but a little book. The inside is made from envelopes (not decorated yet as I don't know which pictures I'll put in). Those can be filled with tags, photos, letters and notes... Whatever you think is worth being kept from this vacation.

I gave this album the shape of an old suitcase. The corners are rounded but then I decided to use some punched corners instead. And I went through my stash to make even the embellishments travel related. I had that Sizzix die of the car for ages and it was just sitting there, waiting for a project like this.
All those stamps are by Stampin'Up and I put one of them on a little tag so it looks like the name tag on a real suitcase.
The street sign is by Quickutz and I bought it from a friend that never used it. It came in very useful here! I guess there is no real sign looking like this regarding what I put on it but I couldn't leave it plain, right? LOL

These are the markers that I used for the coloring:


And before I am going to say goodbye till tomorrow I am going to share another photo of my twins. Since a few asked me to show a pic of them with their little school cones I've been sharing last week. So, here you go:


It was very very early in the morning and they really weren't in the mood for taking pictures that time so sorry for their faces. It's not that they didn't like the cones (they loved them!) - it was just the fact of me taking a picture.LOL

See you all tomorrow!