Hello and welcome to another tutorial thursday here at the Simply Sassy Inspiration Blog!
When I was thinking about what to show today and looked at this wonderful stamp called
Winking Student
I thought how nice it would be to have her put up on my desk. I know, whenever I´ll look at her with this cute face she´d put a smile on my face. And so the idea of making a notepad holder to put up on your desk was born.
You´ll need:
cardstock
patterened paper
a pen to put on the notepad holder
a notepad
the usual stuff like bonefolder, scissors, a ruler, glue...
and of course one of the cute Simply Sassy stamps

Cut a piece of cardstock measuring 12" x 6 1/2" and score it at 2 7/8", 3 1/4", 5 13/16" and 6 3/16".

Cut a piece of the cardstock you´re using for matting measuring 6" x 5 5/8". Cut a 1" strip from the same cardstock. You need to be able to wrap it around the back of your notepad and there needs to be some of it left to glue it down to the base.
Wrap the strip around the back of the notepad, not too tight but also not too loose.
Wrap the strip around the back of the notepad, not too tight but also not too loose.

Slide the cardstock strip as close as possible to the spiral binding.

Place the notepad on the cardstock and mark where to glue down the cardstock strip.

Remove the note pad, add some glue and glue it to the marked area.

You can skip the steps with the paper strip by just glueing down the notepad to the cardstock but I like to be able to exchange it once it´s used up.

You can skip the steps with the paper strip by just glueing down the notepad to the cardstock but I like to be able to exchange it once it´s used up.
Cut another strip of cardstock and wrap it around the pen. Glue it together and cut off the excess.

Glue the paper roll to the cardstock base underneath the note pad and slide in the pen.

Glue the carstock to the card base.

Now you only need to decorate the front and your notepad holder is finished. Glue the decorated front of your notepad holder only to the lower part of the card front like you would for an easel card.

This is how my front turned out. I love the blue and red and white with this image...
To make her glasses look real I added some Glossy Accents to the area where the glas is.
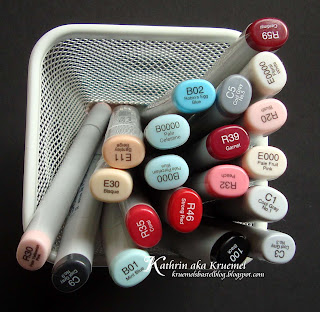
And these are the markers I used for coloring:
To make her glasses look real I added some Glossy Accents to the area where the glas is.
And these are the markers I used for coloring:


What a great idea and a fab tutorial, thank you for sharing this xx
ReplyDeleteFab tutorial and what a greati dea for gifts. Thanks for sharing.
ReplyDeleteCathy xx
I love this project Kathrin. Your sassy girl looks beautiful. I love that you can insert a new notepad once the old one is used up.
ReplyDeletelooks fantastic x
ReplyDeleteFabby tut Kathrin - thanks for sharing !!!
ReplyDeleteHugs, sandra xx
love it...might try making some of these for teacher pressies!
ReplyDeleteThanks so much for this Kathrin, I'll def be having a go at this!! Love it!!
ReplyDeletexxAutumn
such a fab creative idea!!! I do love this image and she looks just fab in that colour combo!!
ReplyDeleteHugs Juls
I just love this...image is fantastic....beautiful job! tfs
ReplyDeletewww.canadiancraftcorner.blogspot.com
Delightful to accent with an apple embellishment & it's so cheerful & useful - love the size & the way it is attached & has a pen to go with it.
ReplyDeletePaula (PEP)
Amazing tutorial Kathrin, thank you so much, your finished project is so gorgeous.
ReplyDeleteHugs
Suzi x