Showing posts with label Autumn. Show all posts

Monday, 12 December 2011

Simply Thankful and Enjoy!

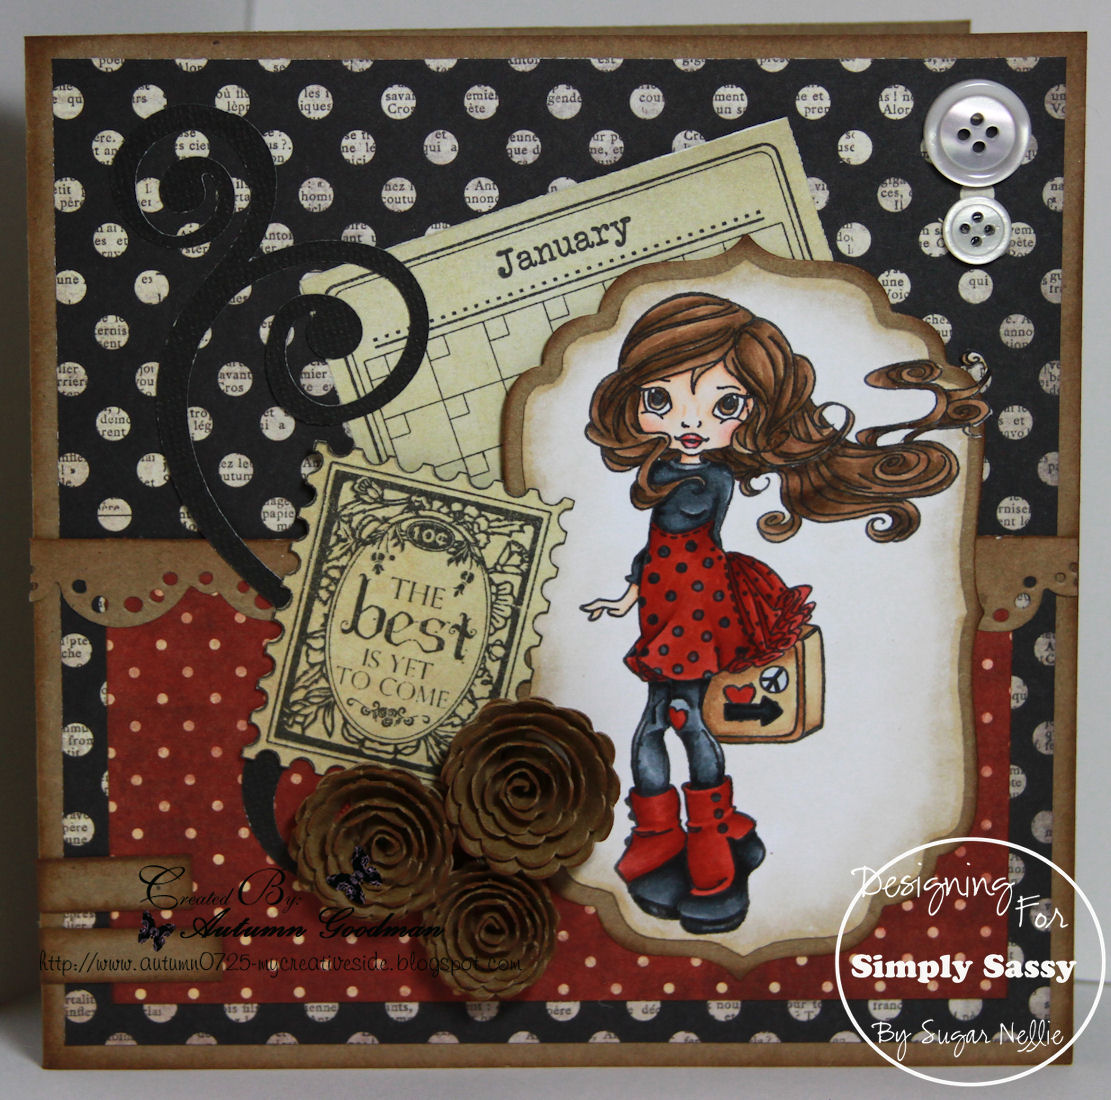
Hello Sassy fans! I hope your Monday is off to a good start.  Today is my last post of this year and I have two projects to share with you. First, I have Cinders who I thought would be great for this...


Thank You card I needed for someone. I've used some wonderful MME papers and colored her up to match.
I also wanted to take the opportunity to Thank you all for stopping by every day and leaving us such wonderful comments. You guys are the best!

Secondly, I've made this...


little tag with Domestic Goddess. I've been known to hand out the baked goods now and again so I thought a tag would come in handy. This is also the first time I've made a tag of this sort I'm happy with,yay.  It's still not quite as good as some, but I'll keep working on it.


Well that's all for me for 2011 I'll see you back here next year! Until then I wish you all a very Merry Christmas and a Happy New Year!


Thanks for stopping by and have a wonderful day!
xxAutumn 


Monday, 5 December 2011

Simply Primping

Hello wonderful Sassy fans! I hope you all had a wonderful weekend! My weekend went by in a flash! Can you believe how quickly Christmas is coming upon us. I think very few people are getting Christmas cards this year :(  How about you, are you on top of your Christmas card list? 

Today's share isn't Christmasy, but perhaps it could give you an idea for a little Christmas gift. I've made a little door hanger...


...using the wonderful Tease Me. I live in a house with four boys and even though I've taught them manners they refuse to use them, so I really could use one of these myself,lol I've kept it pretty simple since it does have the possibility of getting knocked around...I figure the less is there the less likely it is to get ruined, but I've used some fun bright colors and of course lots of pink!  The words say" Primping...Do not disturb!"  and were computer made.  Guess that about explains her. So I'll be heading out, but make sure to stop by later to see what Alina has to share with you!

Thanks for stopping by and have a wonderful day!
xxAutumn

Monday, 28 November 2011

Simply Gifted

Hello Sassy Fans! I hope you all had a lovely weekend. It was Thanksgiving here this past Thursday and then Black Friday shopping commenced...earlier this year than ever, and yes, I headed out at 8pm Thursday evening not to return until 7am the next day! Boy, was I exhausted! Needless to say I now definitely have Christmas on the brain,lol. Our tree is up and in need of some presents!  
That being said I decided I would use the special Season's Greetings stamp and make a tag or two. Well, I thought it would look better displayed on a gift and my tag turned into this...


 ...a pretty little gift box instead. I'm not really sure what happed, it just evolved...sometimes these things seem to have a mind of their own. But now I've got my first box ready for a present and it will be perfect for one of my sister's gifts.

Here's another view...


I love these pretty MME christmas papers. The lace and pearls are from my stash and the pearls are WOC. I was so lucky that I happened to have a jewelry gift box that I'd gotten for something else and didn't use.


Here's a closer view of Season's Greetings. I liked the idea of white hair for some reason, so considering there wasn't much else to color this really came together quickly...I think she's gonna end up on a lot of Christmas stuff. 

Thats all from me for today Ladies. Make sure to stop by later to see what Alina has to show you. Thanks for stopping by and have a great day!
xxAutumn


Monday, 21 November 2011

A Sassy Pencil Keeper

Hello Sassy fans!! WOW, what a turn out we had this weekend, you guys sure did love this release! Thank you so much for hopping along and for giving us all such kind comments. After a weekend full of inspiration I hope you can handle a little more.

Today I've decided to use Book Club.  I really wasn't sure what I was going to make at first, but then I thought writing went along with books and whose to say one of those she's carrying isn't an art journal so this...


is what I arrived at. The pic really doesn't do it justice as it looks much better IRL. The tall one can hold your pencils and pens...maybe some scissors too and the small one is magnetic...great for those small fidgety things. Here's a view filled...


 ... just to give you an idea of the space. It took me a while to decide where best to put her, but in the end I figured she'd be least harmed in the back...things can get kind of crazy on my desk,lol. I've had these little clips for ages and thought they would be a perfect embellishment for hanging little notes.  There's a little empty space in front there and I know they use to make tiny sticky pads, so I'm going to see if I can find one to put there. A few more embellies some stickles ( which you can't really see) and done. 

That's all for me today, but be sure to check back later to see what Alina has to share with you. Thanks for stopping by and have a great day!

xxAutumn

Monday, 14 November 2011

Postitively Perfect Princess!!

Let's say that three times fast, lol.  I hope you all enjoyed a lovely weeked. I was incredibly busy and it went by way too fast, but alas the show must go on!! I see you all enjoyed Erica's sneak for you yesterday and that sure was a beautiful card she made! As you may have guessed from the title I too have the pretty princess to share with you, but I've tried to make her different enough so you feel like it's really something new! So here in my rendition of Cinderella...


For those of you who follow my blog you know that I've recently ventured into distress inks. This is only my third distress ink creation, but I'm being brave and sharing it here as I wanted you all to see something different. I will get better at this, I promise.  Sorry if this looks washed out to you, it actually looks quite the opposite in my editor, so I'm not sure what to do about that. (changed the pic, hopefully it's all better now)

I also wanted to take a moment to say Thank You to all of you for leaving comments. I don't often get enough time to return the compliment but I do read them and appreciate them and  the time it takes you  to leave them! You guys are the best!

Have a wonderful day!
xxAutumn


Monday, 7 November 2011

Sassy Ornament

Hello wonderful sassy fans!! How are you this Monday? Well, I hope! We had a beautiful weekend here(minus the earthquake that scared the bejeebers out of me) and I hope yours was well too. I was thinking about what to make for today's post and I recently made a cute, simple , yet effective ornament that my kids will give as teachers gifts and I really wanted to make more...I actually had a lot of fun doing it. So, here it is...


and if you want to make your own like this you will need:

1 Sassy image(I used Puppy Love)
Spellbinders Nestabilities:
Large Circles-largest one
Lacey Circles-largest one
cardstock
lightweight cardboard(I recycled a waffle box)
ribbon/trim 
glue


First you will need to cut and color or vice versa your stamped image with the large circle die. Second cut out one each of two different colors(or different shades of same color) and one cardboard piece with the large lacey die.

Choose which of the two colors will be the back color on your ornament and attach it to the cardboard piece...if your recycling like I did make sure the designed side is the one getting the tape as the other will be seen. Now place the remaining lacey piece  evenly on top of that piece then turn until the colors are every other like this...


Now you can hold one side and tape the other then switch Next, center your image on top of your collective lacey pieces and tape down. Flip it over and apply a looped hanging string of sorts(ribbon or whatever) to the back. Next, again using the large circle die cut a circle out of your cardboard and place it centered on the back to hid the ribbon that doesn't need to be seen. If you used something a little thicker and have a pretty rounded trim and some pop up dots you can put the trim around the edge of the circle and the dots somewhere central before putting it on the back, like this...


Well, that's all for me today, hope you've enjoyed my mini tutorial. Make sure to stop by later and see what Alina has to show you. Thanks for stopping by!

Have a wonderful day!
xxAutumn


Monday, 31 October 2011

Winking Student

Hello sassy fans!! Hope your Monday is off to a good start! Today I have the adorable winking student to share with you and I made this...


 ...bookmark with her. I've kept her pretty simple since I figure you will want to be able to close the book, but I think she still stands out fairly well. This is actually my first corner bookmark and if you haven't made on already, you really should give it a go and they're great for using up scraps!

That's all for me today folks, but make sure you stop by later to see what Alina has to share with you.

Thanks for stopping by and have a wonderful day!
xxAutumn

Monday, 24 October 2011

Simply Sassy Snowglobe Tutorial


Hello Sassy Friends! Autumn here with your first Monday inspiration and I've made a special card and tutorial for you. I came up with a snow globe, shaker, easel card last year and I thought with Christmas upon us you all might enjoy some instructions for that.  I also decided I would attempt a video for this and well, lets just say it's not perfect, but it's my first time, so please bare with me. First, here is...


Tammy in my rendition. I am so sorry for the terrible pics of this, but I was having problems with You Tube and by the time I could take the pics it was really dark out. I will take new ones tomorrow. Imagine with  and some blue papers and you'll get the idea :)

Here are the templates you'll need and the background paper I made and used. Just click on these to make them normal sized and then save. I had a little trouble getting the back globe piece and the circle to match up, but that may just be my printer. If it happens to you, just match up the circle with the lower half of the back piece and you should be good to fo. My apologies in advance, I don't know why it just wouldn't work for me. Oh' also you want to cut on the outermost edge of the circle and the inside edge of the globe base.


*** edited to add*** I figured out how to make the shape in psElements, so the above is the correct size and shape. Cut along the outside lines and round the corners at the bottom and you're good to go. This is in PNG, but if it's needed in jpeg please let me know.


And now on to the videos. Yes, that's plural, as there are several steps involved, but none of them are longer than 10 min :) I will apologize in advance for the number of times I said "ok,so" apparently this has replaced "um" in my vocabulary and my dog and the kiddos got in the way a couple of times, but I just didn't have time to start all over. Oh' and let's not forget I said snow once and actually sounded like those people on FARGO...I couldn't believe that one!!! I really apologize for that!! Alright then, let's hope this works!!
Number 2
Number 3
Ok, that's it. I hope I didn't forget anything, but if I did or you have other questions please feel free to ask and I will get back to asap.
Thanks for stopping by and have a wonderful day!
xxAutumn

Monday, 17 October 2011

A Sassy Fashionista!

Today's Inspiration goes back to almost the beginning of the Sassy's. I've used Fashionista found here with Laid Back Dude. I've used her alone, but they make a great pair.  Here's my creation...


It's not heavily embellished as it actually opens by pulling that bow. It opens up to the brown paper layer and the doily. I got a little stuck with the inside, so I will try to post pics of it finished later.
Sorry, I need to keep it short and sweet today, but thanks so much for stopping by and make sure to stop back later to see what Alina has to share with you.

Have a great day!
xxAutumn

Monday, 10 October 2011

Hittin' the town!

Good Morning Sassy fans!! I hope you are all well today and got yourselves a nice relaxing weekend.  Today I've  used 'Let's Hit the Town'....


 ... coupled with some beautiful new Prima papers I got a couple weeks ago. I love her outfit here, but boy did I have a hard time making it work,lol. I had to color her twice!! Anyway, I thought these papers were perfect for the vintage shabby look so I tried to make that work.


I really love the light pink I managed, it's so soft and feminine. The dies I used for the cut-out behind her are Spellbinders and everything else was cut with my cricut.

Well that's all for me today, be sure to check back later and see what Alina has for you.
Thanks for stopping by and have a nice day!
xxAutumn 

Monday, 3 October 2011

So What!

Hello lovely Sassy followers, hope your Monday is off to a good start! Autumn here with your first bit of inspiration for today and as the title shows I have  'So What' to share with you today.


I really saw her as being used for a CAS card and I found a great sketch over at CLP go help me incorporate that wonderfully.  I found this fab paper in a MME pad and thought they would be perfect for her. The blue stuff is some self adheasive mesh I got ages ago and I don't know where it's from. 


she was colored with copics(sorry I don't have those for you, I was working on to projects again), but if there's something you really want to know I can probably figure it out. The pink shading was done with pebbles chalks and I used a few gray prisma's for shading. 

That's all for me today, short and sweet for ya! Thanks for stopping by and be sure to check back later to see Alina's fab creation!

Have a great day!
xxAutumn 


Monday, 26 September 2011

Simply Angellic

Hello lovely Sassy Fans! Did you have a good weekend? I had  a relatively relaxing weekend and that was sooo nice for a change. I know you're not here to hear about my weekend, so here's what you came for...


 ...the ever beautiful 'Tiffany'. I love, love, love her and love her even more with wings...she just perfect for them! I'd like to say I came up with that idea myself, but no, I snagged it from Paula who had given her butterfly wings on her blog hop card.

I again tried to go a new direction and went out of my comfort zone coloring her hair and eyes unusual colors. I have to admit I really enjoyed giving myself a little more artistic freedom. I knew right away that I wanted to color some part of her purple and luckily I had these beautiful papers from Kaiser Kraft that worked
perfectly.


Here's a closer look, and again I added some deeper shadows with some pencils...it's so much easier to use a pointed tip for those shadows!I have a rather large list of copics, but I had originally colored her skirt a light purple and then felt it didn't add enough contrast against the background, so I colored it darker.

I will leave you with the copics I used...


Thank you all for stopping by today and don't forget to come back later to see what wonderful creation Alina has to show you.

Have a great day!
xxAutumn

Monday, 19 September 2011

Simply Sweet Sundae!

 Hello Sassy Fans! I hope your Monday is off to a good start! Thanks so much to all of you for hopping around with us for the new release this weekend! You guy's are a great group of followers!! 

For today's inspiration I have used...

 ... 'Sundae Service'. Don't you just love this stamp!! So much fun to color and it just so happens I was able to nab the perfect stack of papers( BoBunny's Sweet Tooth) for her. I did follow the sketch over at CLP for this one and I really love how it turned out.


Here's a closer view. I did something a little different(for me) and added some deeper colors using some Prismacolor pencils and I really love the effect...I'm hooked!! I know people have been doing this for a while and our own Maria has given us a little tutorial before, but it took me a while to get on the band wagon. Anyway, here's a pic of my copics...


... yep, I used all of those in some way or another,lol
and the pencils...


930(magenta), 994(process red), 995(mulberry)
I actually used these to change the color of her skirt to what you now see

1074(French grey), 1083(putty beige)
for shading around and under her

947(dark umber)-hair, 905(aquamarine)-leg warmers 

Well, that's all for me today, but remember to stop by later to see what beautiful creation Alina has to share with you.
Have a great day!
xxAutumn

Monday, 12 September 2011

Sassy Sneak Two!

Hello Sassy Fans!! Did you all enjoy Erica's sneak yesterday, do you wanna see more?? Well, I am here to serve, so may I present to you....
The ever so stunning(even when traveling)...

  'Travel Lite'. She totally has it all under control if she can look like that when traveling, don't you think...I usually look like I just crawled out of bed,lol. Anyway, you didn't come here to listen to me blather. Here's what I made with her...


 This is really outside my norm again, but I really loved these papers together and decided just to go with it. The Whimsy sentiment seemed fitting for just about any occasion and went with the image too, yay!! 
She's actually sitting on a pocket so i can easily update the month stamp if needed. Sorry I don't have colors for you as I colored it at two separate times, but I can tell you I got that rich red by putting down a layer of E31 before my reds(R29,27,&24) 

Well, I will leave you with that today. I hope you've enjoyed this sneak.
Thanks for stopping by and have a great day!
xxAutumn 

Monday, 29 August 2011

Team Spirit

Good morning Sassy fans!! Welcome to your new Monday inspirations! We're all sad to see Tracy go, but wish her the best of luck! I(Autumn) will be taking over the Monday morning posting so here is my inspiration for today...


Here is ' Team Spirit '.  I hope this pic is ok. We recently got a Mac laptop and that's what I'm using while I'm away and they looked really blurry in the iPhoto program. Anyway, i've paired this lovely with some beautiful new Prima papers I recently got and colored her as best I could to match...this took some real blending, but I think it turned out pretty close. I had to leave it kind of simple on the outside because I wrapped her border with ribbon and I made it one of those half easels...


I really love the mix of color in this paper and I was even able to get that beautiful sentiment from the 6x6 paper stack. Those flowers are WOC and the pearls are from my stash.


Here's a closer view of those colors. I love the look of the ribbon wrapping, but boy does that add some dimension making it a little hard to decorate around.

Well, that's all for me today. Thanks for stopping by and have a wonderful day!

xxAutumn

Wednesday, 24 August 2011

Blast from the past

Hello Sassy Fans! Autumn here with your first Wednesday inspiration post of the day and as the title states today I'm showing you an older Sassy, 'Fairy Tale'. I've  also gone a little out of my norm with this one and I'm really hoping you like it...


I made this card in a really unusual way for me as it sort of just came to me while I was in the middle of making another card. I was looking for papers to match something and it occured to me the two of the papers I came across would look good together...even though not right for the current project, so I set them aside. Much to my delight I discovered I had this beautiful Fairy Tale all colored up and just waiting for some papers and IMP they went together perfectly.


Here's the inside. More stuff I don't normally do, but I really quite like it. The stripey paper on the far right is also a pocket as I'm still not sure if I like the tag outside or in. So, what do you think about these papers, does it work for you...this is sooo far outside my normal thing I really wasn't sure, but sometimes you gotta go with your gut.


Here's a closer view of 'Fairy Tale'. Sorry I don't have a copic list as she's been sitting all colored up for a while. I do love the reddish tint to her had and really hope I can do something similar again.

That's all for me today. Thanks for stopping by and have a great day!

xxAutumn


Monday, 15 August 2011

Pretty in pink!

Good morning Sassy fans! Hope you all had a wonderful weekend! It's Autumn here with your Monday inspiration as Tracy and I have switched days this week. Today I've decided to use City Girl and our very own Maria Therese's sketch over at the Sugar Bowl. Firstly, my card....


  and here's the sketch...


 I usually have a really difficult time with sketches, but this was super easy to follow and my papers came together really quickly, I was so happy!! 

These pretty papers are mostly Teresa Collins, but there's a touch of Bo Bunny in there too.  I Love this paper pack and am so happy I bought two! I have to admit this was first going to be a rather simple card...would've worked that way too, but I thought to myself it could be so much more as well. So, I pulled out my ever dwindling flowers and got to work. It took me a bit, but I finally came up with something I was happy with and I got to use one of my new Whimsy sentiments,  yay!


Here's a closer view of City Girl. Sorry, I do not have a copic list as she's been colored up for a while. I know with the pink and black she's kind of like a recent post of mine, but I promise I'll try to stay away from the combination for a while:) The edging was done with a cat's eye silver ink pad and then some stickles for exta sparkle. The flowers are from WOC and the die cut was done with my cricut.

Well, I think that about covers everything and hopefully I've done an ok job filling in for Tracy...be sure to stop by on Wednesday for her post this week. Thanks for stopping by and have a great day!

xxAutumn 

Wednesday, 10 August 2011

Tune Time

Hello Sassy Fans! How are you today?? Hope you are having a good week and been enjoying the inspiration so far. Today I've decided to use ' Lost in Music'...

This was so me as a young girl. I have to say tho that you wouldn't find me sitting down listening, I was dancing around and sometimes there was just the music in my head keeping me dancing,lol I think dear sweet DD is going to be the same,lol Just two years old and any time(and I mean any) music comes on she starts to boogie!

I've colored this image with copics(pictured later) and the background...though it always seems to get washed out in the pics was done with chalks. 

Anyway, here's the card...

full of glittery goodness, lol. I may have gone a little overboard on the stickles, but who hasn't done that a time or two, huh. She kind of looks to me like she's sitting there listening to her music dreaming about what her future may be and so the dream ticket(Tim Holtz) seemed fitting to me. The stitching here was done with my sew easy tool and some glittery floss they also sell. The flowers are a mix and the papers are a Sassafrass mix.


Lastly, I even have my copics to share with you. It's been a while since I remembered those and that pink was a mix of colors but I think everything else should be easy to figure out. Please let me know if you have any questions.

Thanks for stopping by and have a great day!
xxAutumn

Wednesday, 3 August 2011

Strike a Pose!

Hello Sassy fans and welcome to another wonderful Sassy Day! Today as you have figured out, I'm sure, I've used the wonderful Strike a pose(Funky Kits is not coming up for a link right now, but I'll try again later, sorry) and followed the current sketch over at the Sugar Bowl and I've come up with this...


Sugar Bowl Sketch

I was orginally going to use the City Girl image to give you all something different, but after i had her all colored up I messed up the background and had to cut her and and then she didn't work, and to be honest I wasn't completely thrilled with the card anyway, so I decided to color up Strike a pose and much prefer how the card came out this way. 

The optional theme at the Sugar Bowl is lace and so I added that and even made a flower with some and broke out my feathers and put a few of those in there too...I think they're quite fitting.


Here's a close up of my girl. I do find that coloring in black can be rather difficult for me, so I hope she turned out ok...the hair is probably the hardest part, but I wanted to do something different. I added  some stickles the her flowers, but left the rest of her glitter free. 


That's all for me today. Thanks for stopping by and have a wonderful day!
xxAutumn 


Wednesday, 27 July 2011

Butterfly Girl

Hello Sassy Fans!! Aren't you just loving these new images!! I know I am. When I saw Butterfly Girl for the first time I completely fell in love with her and new I wanted to do something different. Here's what I came up with...


... A wall hanging which will go in my daughter's room. I spent the better part of a day putting together the background with some digi's from "Make it Crafty" and then had to try my hand at putting the whole scene together and to my excitement it worked on the first try! Sorry for the shadow in the box there, but I took this pic at night and just couldn't manage one w/o it.


 Here's a photo outside the box and as you can see tons of coloring went into this!! The whole thing was colored with copics...no air brushing involved(I'm not lucky enough to own one of those) Other than that though it was pretty simple. I painted the frame added some embellishments and put it all together. Now I just need to find just the right spot in baby girls room...she was sleeping when I finished this and I'm in the middle of redecorating, so it may wait a little bit.

Well, that's all for me today. I hope you have enjoyed my projected...I'm of course thinking now it may need some sparkle, but time will tell. Thanks for stopping by!

Have a wonderful day!
xxAutumn